|


|

|
|
|
Installing Disc Brakes on Your 2WD Pickup |
|
 |
|
PAGE [
1 ] - [ 2
]
If you're like most people, you like being able to come to a rapid and
complete stop when you push down on the brake pedal. When the auto
manufacturers began to discover the advantages of using brake discs on
the front end instead of drums, the option quickly became a favorite for
consumers, so much so that it didn't take long for most manufacturers to
make front disc brakes standard on most of their vehicles. However, if
you're the owner of an older Ford truck, more than likely it's still got
the old tried-and-true four-wheel-drum setup.
Although Ford started installing disc brakes on the F-250 in 1968, they
were not factory-installed on the F-100 until 1973...the first year they
were standard equipment on all F-100 through F-350 trucks. However, the
front disc brake setup on the '73-'79 trucks is a direct bolt-on for
Twin I-beam-equipped trucks back to 1965...if the I-beams and spindles
are swapped as a pair! (You CAN do some mixing/matching as detailed
below, but it's always better to keep I-beams and spindles properly
mated.)
While there ARE disc-brake
conversion kits available, the easiest way to convert your truck to disc
brakes is to simply find a '73-'79 donor truck and salvage all the brake
hardware. If you've got an F-100, you'll need to find an F-100/F-150 to donate
it's parts, as few F-250 disc brake spindles will fit your F-100
I-beams. (In addition, the F-250 calipers are a dual-piston design which
is not as desirable and would give you an 8-lug setup on the front
instead of 5-lug.)
FYI:
The disc brake setup is nominally wider than the drum-brake versions, so your track width
will marginally increase, but not enough to notice or for it to be an
issue unless you're using wider wheels/tires that barely clear the
fender as/is.
However, there IS a
difference in some disc brake setups used on the F250/F350 trucks.
Depending on the axle rating, some F250 disc brake setups use F-100 or
even F-350 parts. And if that's not enough, the larger units also
have 9/16" wheel studs vs. the 1/2" studs of the smaller units.
Therefore, when performing this swap on an F250, be sure to check the
GVW rating on the donor truck to be sure that you know what you're
getting. Use this handy chart I put together after spending an entire
evening researching kingpin diameters:
|
'65-'79 FORD TRUCK TWIN I-BEAM
AXLE MODEL APPLICATION CHART |
|
MODEL |
DESCRIPTION |
KINGPIN
SIZE (IN.) |
| 65-67 F100 |
|
6.35 x .85 |
| 68-70 F100 |
|
| 71 F100 |
I-beam forged C8TA 3008 or 9-B |
| I-beam forged D2TA 3008 or 9-DA |
| 72 F100 |
|
| |
| |
| 65-70 F250 |
w/ 12-1/8" x 2" drum brakes |
6.35 x .85 |
| 66-70 F250 |
w/ 12" x 2-1/2" drum or disc brakes |
| 71 F250 |
I-beams forged C8TA 3008 or 9-B - Before
Ser. M00,001 -
w/12-1/8" x 2" drum brakes |
I-beams forged D2TA 3008 or 9-DA From Ser.
M00,001 -
w/12-1/8" x 2" drum brakes |
I-beams forged C7TA-8-9-A or C8TA-8-9-B -
w/12" x 2-1/2" drum or disc brakes |
I-beams forged D2TA 3008 or 9-DA (From Ser.
M00,001)
w/12" x 2-1/2" drum or disc brakes 6100# - 6900#
GVW |
I-beams forged D2TA 3008 or 9-BB (From Ser.
M00,001)
w/ 7500# GVW |
6.45 x 1.05 |
| 72 F250 |
w/ 6200# GVW axle I-beam stamped D2TA 3008
or 9-DA
(From Ser. M00,001) |
6.35 x .85 |
| w/ 6900# GVW axle I-beam stamped D2TA 3008
or 9-DA |
| w/ 7500# or 8100# GVW axle I-beam D2TA 3008
or9-BB |
6.45 x 1.05 |
| |
| 67-72 F350 |
|
6.45 x 1.05 |
| |
| 73-74 F100 - 2/W/D |
|
6.35 x .85 |
| 75-79 F100/150 - 2/W/D |
|
6.49 x .85 |
| |
| 73-74 F250 (Regular Cab) - 2/W/D |
With 6200 lbs. G.V.W. |
6.35 x .85 |
| With 6900 lbs. G.V.W. and without 460 C.I.D.
engine |
| With 6900 lbs. G.V.W. and 460 C.I.D. engine |
6.45 x 1.05 |
| With 7500 and 8100 lbs. G.V.W.
|
| 75-79 F250 (Regular Cab) - 2/W/D |
With 6200 thru 6900 lb. G.V.W. |
6.49 x .85 |
| With 7500 thru 8100 lb. G.V.W.
|
6.45 x 1.05 |
| 74 F250 (Super Cab) - 2/W/D |
6300, 6900 & 7500 lb. G.V.W. |
| 8100 lb. G.V.W. |
| 75-79 F250 (Super Cab) - 2/W/D |
|
| 73-74 F250 (Crew Cab) - 2/W/D |
|
| 75-79 F250 (Crew Cab) - 2/W/D
|
|
| |
| 73-74 F350 - 2/W/D |
3.8M |
6.45 x 1.05 |
| 75-79 F350 - 2/W/D |
|
One other note: I spent
some time comparing the F-100 I-beams from '67-'79 Ford trucks and have
found a few interesting items. In addition to the differences in
kingpin diameters and heights, there was also a change in the steering bump
stop on the I-beams/spindles for certain years. You can read the entire article
"Comparing I-beams and spindles" for
more information, but basically it comes down to this:
-
If you're using
'75-'79 spindles, use '75-'79 I-beams and kingpins
-
If you're using
'68-'74 spindles, use '68-'74 I-beams and kingpins
-
If you're using '67
I-beams, use '73-'74 I-beams and kingpins. However, the round pin used
for the bump stop in the '67 I-beam may need to be trimmed or modified,
as
needed.
-
1965 has
one-year-only kingpins, so if replacing spindle out and replacing
kingpins, use 1965 kingpins.
NOTE: These recommendations are not based as much on kingpin size as
they are by steering stop (bump stop) configurations between the
different years of I-beams and spindles. You might find that by
mixing/matching certain years of I-beams and spindles, your truck's
turning radius could either be increased (meaning likely tire rub at
full turn) or decreased.
You can now see why
it's highly recommended to simply find yourself a '73-'79 donor truck
and get ALL the brake parts from this truck for use in your project.
It alleviates a LOT of headaches involved when attempting to mix and
match parts.
Well, enough of the babble....let's get started! Follow along as I convert my '67 2WD SWB to disc brakes using all the
parts from a '79 F-150 donor truck.
|
|
FRONT-END REMOVAL
The disc brake spindle is connected to each I-beam with
a kingpin. While it's possible to drive the kingpin out manually while
working on a parts truck in the field or salvage yard, it's going to
require a LOT of effort. However, the ENTIRE front end can be dropped
out as a unit in less than an hour with hand tools, so this is
definitely recommended. You can then take your parts home and fight with
the kingpin in your shop or garage, where you have access to tools and
cool liquid refreshments. Here's what you need to do to drop the front
end:
1) Remove
two bolts holding the coil spring retaining strap at the top.
2) Loosen the upper shock absorber nut about 90%, but don't remove it
completely.
3) Disconnect the tie rod from the steering box's Pitman arm and
separate the drag link from the center link.
4) Disconnect the brake lines at the caliper.
5) Remove the large nuts holding the rear of the radius arms to the
frame brackets.
6) Remove the I-beam pivot bolts and pry the I-beams out of the frame
brackets.
At this point the suspension assembly should be hanging by the shock
absorbers. Put a hydraulic jack under one side's brake assembly and jack
it up a bit to relieve the tension, then lay on your back and give that
side a couple good hard kicks forward to slide the radius arm out of the frame
bracket. Then remove the shock absorber nut and lower to the ground.
Repeat for the other side.
Other pieces
you need to be sure to grab from the donor truck include:
- Brake
hose frame brackets (see Fig. 4)
- Master
cylinder/brake booster
- Brake
proportioning valve - also snip the end off the valve's wiring, to
splice into your existing harness so your brake warning light works
properly. You'll also need the fittings going into the valve, so if
you're planning on replacing all the lines, just snip them at the
valve, leaving yourself several inches of line.
- Front
steel brake lines (these probably need replacing, but grab 'em anyway
to use as templates for bending your own lines)
-
steering linkage (and possibly the Saginaw steering box's Pitman arm - more on this
below)
Most of the brake components will be replaced with new parts, including
the rotors, calipers, bearings, hoses and pads. |
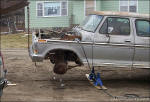
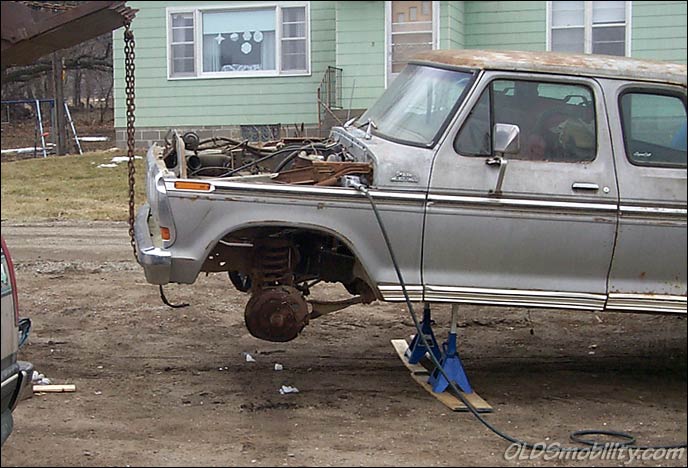
Fig. 1 - A quick before shot. The truck is setting on jackstands,
but the front end loader is also supporting the truck, just as a backup.
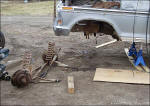
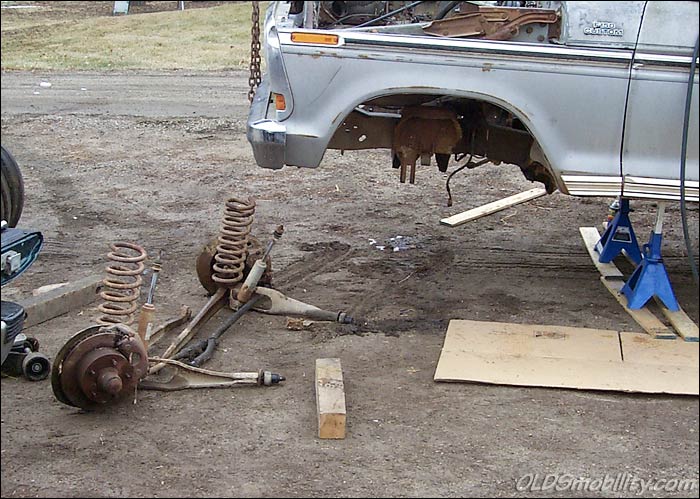
Fig. 2 - It only took me about 30
minutes to drop the front end from this '70 F-150.
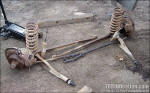
Fig. 3 - Here's the front end unit
ready for it's new home.
Fig. 4 - I found that one of the brake line brackets was riveted to
the frame, while the other was simply bolted. Since I didn't feel like
messing with removing the factory rivet, I just grabbed another bolt-on
bracket from a different truck. |
|

|
|
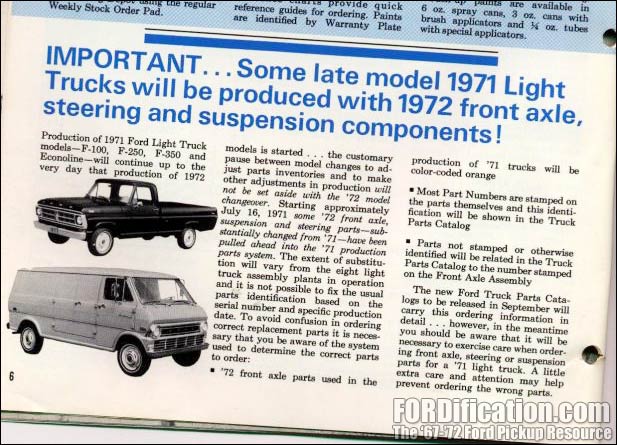
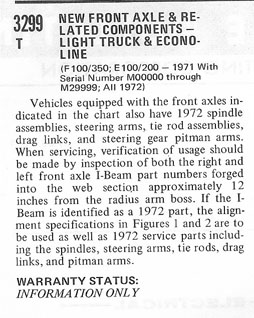
IMPORTANT NOTE:
Ford did some redesign of the front end components beginning on
late-'71 trucks, including the Pitman arm. If you're installing the
disc brake setup on an early-'71 truck or earlier and attempt to use
your original steering linkage, you'll might discover that the tie
rod end will not fit the Pitman arm. You'll either have to use the
steering box (or at least the Pitman arm) from the donor truck. Read
the scans at right from the factory Technical Service Bulletins for
more info. |
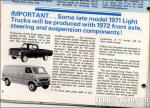
Fig. 5 |
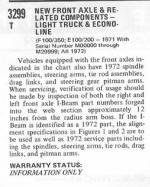
Fig.
6 |
|
For more detailed
information on the differences in steering hardware mentioned in the
above TSBs, visit the
Steering/Suspension Component Variations
page. (This page is currently under construction, but there are some
comparison photos which will help show the variations.) |
|
|
|
ABOUT KINGPINS &
BUSHINGS
Once you get your parts home, you can start the disassembly. Remove the
calipers, rotors, springs, radius arms and steering linkage. You should
be left with the I-beams and spindles, held together with the kingpins.
While it's possible to remove the kingpins in your shop,
I'd highly suggest just dropping them off at your local machine shop and
having them press them out with a hydraulic press...a 15-20 minute job
for them that shouldn't cost you more than about $20-$30. If you're not
planning on cleaning up and painting your I-beams prior to
reinstallation, be sure to bring your new kingpin set for them to press
in at the same time. The kingpin kit should only run you about $50 and
it's installation will be another $50-$75...well worth it.
|
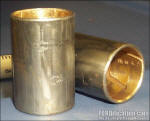
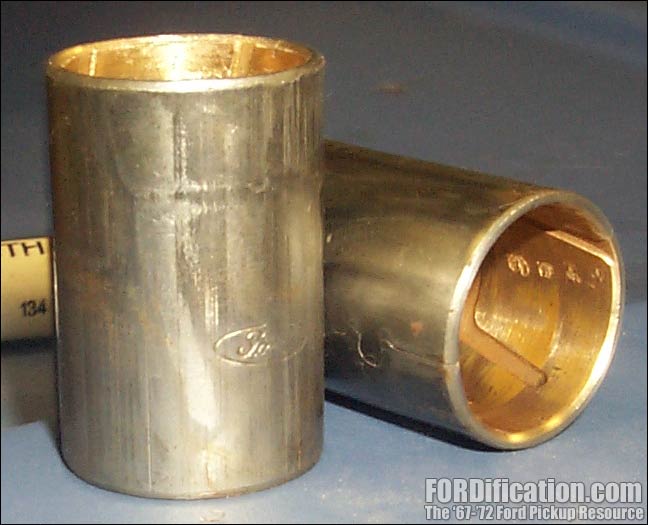
Fig. 7 - Here are the kingpin
bushings that were removed from my '79 spindles. You can still see
the Ford logo. Also note the 'jigsaw puzzle' style of connector of
the rolled bushing. |
Kingpin bushings are
available in bronze and nylon versions. The bronze bushings are
actually steel with a bronze inner lining and will need to be reamed
(NOT honed!) by the machine shop after installation to properly fit the
kingpin. The nylon bushings don't require reaming and can simply be
installed by hand. However, while the bronze bushings will give you
100,000 miles or more of service, the nylon versions don't last nearly
as long. Some users report having to replace these after 30,000-40,000
miles. And while they're easier to replace when they DO wear out, who
wants to go through this again?? Just use the bronze bushings, keep 'em
greased up and you'll probably never have to worry about them again.
The bronze bushings are
'rolled' bushings...that is, they are manufactured from flat stock and
then rolled around into a tube and secured with a connection which bears
a resemblance to a jigsaw puzzle connector (See Fig. 7). Out of the box,
they are not 'true', which is why it's mandatory to ream them to snugly
fit the kingpin.
Well, let's get those kingpins out!.....
PAGE [
1 ] - [
2 ] |
|
 |

Want to link to
this site? Please save this banner to your hard drive to place on your
webpage.
The correct link to use is
http://www.fordification.com
|